
Prompt Tips for Tooners #3 - 10 Camera Shots and Angles
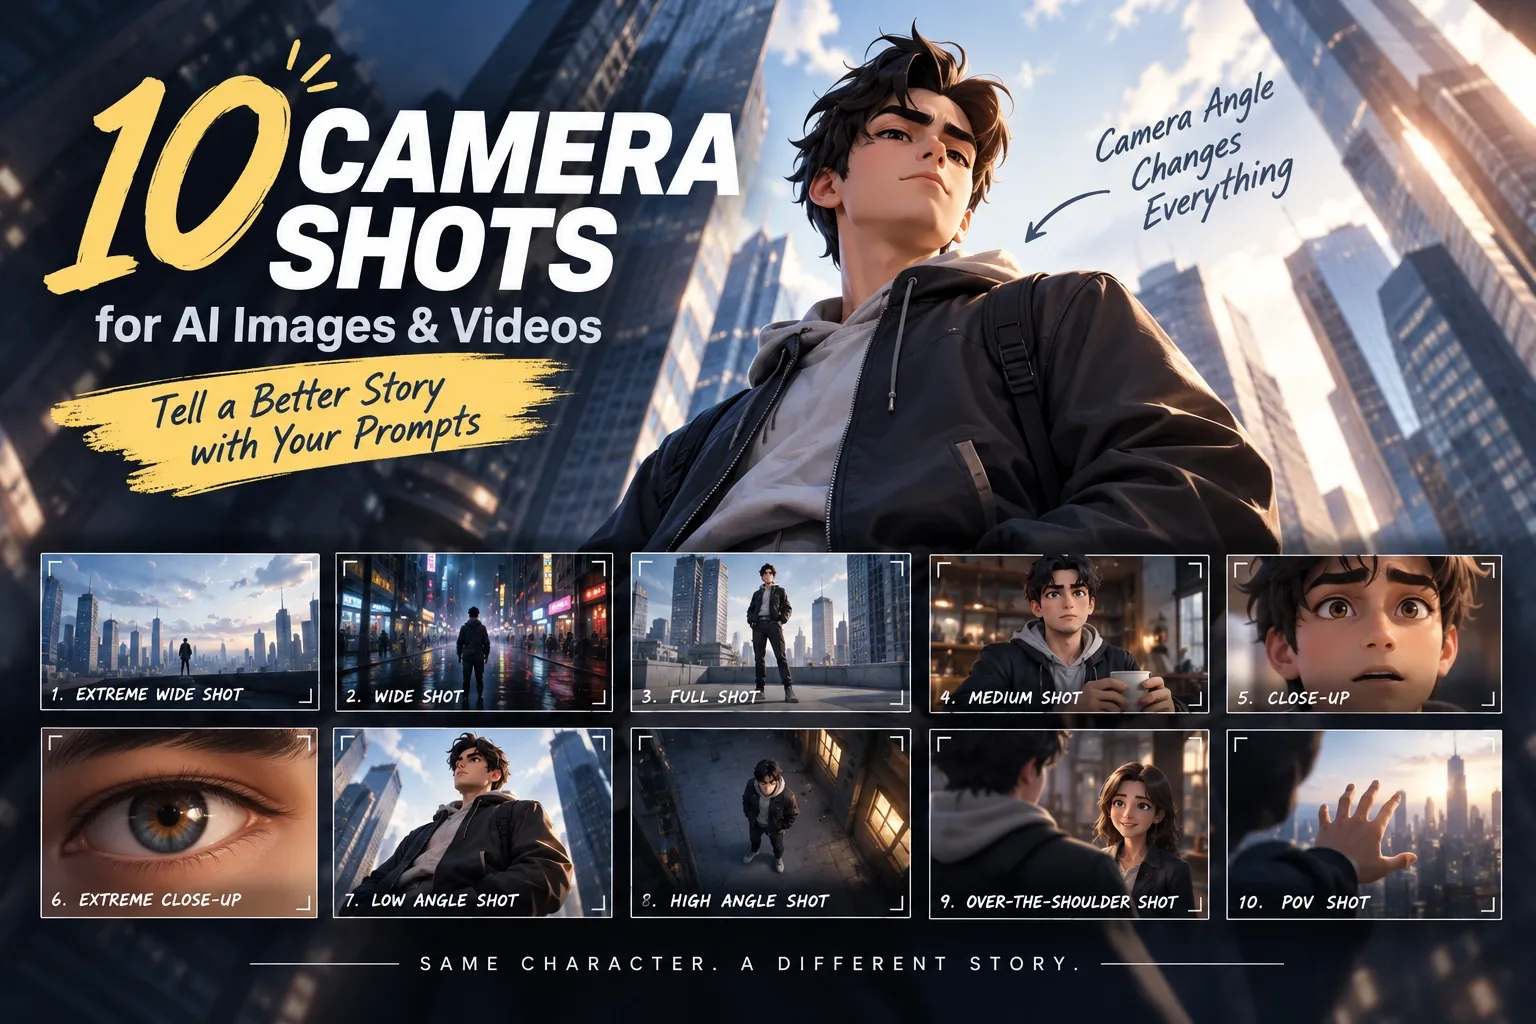
The same scene can look completely different depending on camera composition. From Extreme Wide Shot to POV Shot, this post introduces 10 camera shots and angles you can use directly in AI image and video prompts.
What happens if you simply ask AI:
"Create a scene of a character standing."
Of course, AI can generate a scene with a character standing.
But the result may be quite different from what you imagined—whether you wanted a powerful entrance, a close-up that clearly captures emotion, or a cinematic shot that showcases a vast environment.
Even with the same character in the same location, the mood of a scene can change completely depending on where the camera is placed and how closely it frames the subject.
In this article, we'll explore 10 common camera shots and angles you can use when creating AI images and videos.
Prompt #1 — Describe the Scene Without Camera Direction
James is standing in the middle of the city.
Prompt #2 — Add a Camera Angle
James is standing in the middle of the city.

Shoot James from below using a Low Angle Shot.
Prompt #3 — Add the Shot, Framing, and Visual Intention
James stands alone between massive city buildings.

The camera is positioned below James, looking up at him in a Low Angle Shot.

Frame James's upper body together with the towering buildings behind him, making him appear more powerful and intimidating.

Create a strong, cinematic atmosphere, like the first appearance of a main character in a movie.
Can You Feel the Difference?
All three prompts ask for essentially the same thing:
"James standing in the city."
However, as more camera information is added, AI can understand much more clearly from which perspective the scene should be shown.
The first prompt only describes the character and the action.
The second prompt adds a specific camera angle: Low Angle Shot.
The third prompt goes one step further by explaining what should appear inside the frame and why that particular composition is being used.
Instead of stopping at:
James is standing in the city.
you can structure the scene like this:
Subject → Camera Shot → Framing → Visual Intention
🎥 10 Camera Shots and Angles for Tooners
1. Extreme Wide Shot — Show the Entire Environment
An Extreme Wide Shot focuses more on the environment and overall space than on the character.
The character appears relatively small within the frame, while the surrounding environment becomes the main visual focus.
Extreme Wide Shot of James standing alone in a vast desert.
This shot works especially well for:
- Massive cities
- Vast natural landscapes
- Battlefields
- Outer space
- Introducing a new location
It is particularly useful when you want to establish the scale and atmosphere of a location before focusing on the character.
💡 Tooners Tip
If you want viewers to understand where a scene takes place before anything else happens, try using an Extreme Wide Shot.
It also works naturally as an Establishing Shot, which is commonly used in films when introducing a new location.
2. Wide Shot — Show the Full Character and Environment Together
A Wide Shot typically shows the character's entire body within the frame.
It is useful when you want to show both the character's movement and the surrounding environment.
Wide Shot of James walking through a rainy street at night.
It works especially well for scenes involving:
- Walking
- Running
- Dancing
- Fighting
- Character entrances
In action scenes, starting with only Close-Ups can make it difficult to understand where the characters are positioned.
A Wide Shot helps establish the characters' locations and movements, making the flow of the action easier to follow.
3. Full Shot — Focus on the Character's Entire Body
A Full Shot shows the character from head to toe while placing slightly more emphasis on the character than a Wide Shot does.
Full Shot of James standing confidently with his arms crossed.
It is particularly useful when clothing, posture, or full-body design is important.
For example:
- Character design reveals
- Fashion
- Hero poses
- Characters holding weapons
- Full-body action
4. Medium Shot — A Versatile Default Shot
A Medium Shot usually frames a character from around the waist or upper body upward.
Because it captures both facial expressions and body language to some extent, it is one of the most versatile camera shots.
Medium Shot of James talking to Alex inside a cafe.
It works especially well for:
- Conversations
- Interviews
- Character introductions
- Everyday actions
- Scenes involving hand gestures
If you're not sure which shot to use, starting with a Medium Shot is often a good choice.
5. Close-Up — Emphasize Facial Expressions and Emotion
A Close-Up fills much of the frame with the character's face.
Close-Up of James looking shocked as he realizes the truth.
When emotion is the most important part of a scene, bring the camera closer.
Close-Ups work particularly well for emotions such as:
- Surprise
- Anger
- Sadness
- Tension
- Determination
Instead of simply writing:
James looks surprised.
try:
Close-Up of James as his eyes widen in shock.
Adding the camera shot helps communicate the emotion much more directly.
6. Extreme Close-Up — Highlight Small Details
An Extreme Close-Up moves even closer than a standard Close-Up, emphasizing specific details such as the eyes, lips, hands, or an important object.
Extreme Close-Up of James's eyes slowly opening.
Or:
Extreme Close-Up of a finger pressing the red button.
This shot works especially well for details such as:
- Eyes
- Tears
- Triggers
- Buttons
- Phone screens
- Important clues
Use it when there is a small detail that viewers absolutely need to notice.
7. Low Angle Shot — Make a Character Look Powerful and Intimidating
A Low Angle Shot positions the camera below the character and looks upward toward them.
Low Angle Shot of James standing on the rooftop.
This angle can make a character appear larger, stronger, and more dominant.
It works particularly well for:
- Hero entrances
- Villain entrances
- Powerful characters
- Victorious characters
- Intimidating moments
For example:
Low Angle Shot of James looking down at his opponent after the battle.
This can make the victorious character feel even more dominant after a fight.
8. High Angle Shot — Make a Character Look Small or Vulnerable
A High Angle Shot places the camera above the character and looks down toward them.
High Angle Shot of James standing alone in a dark alley.
Unlike a Low Angle Shot, this angle can make a character appear smaller, weaker, or more vulnerable.
It works well for scenes involving:
- Loneliness
- Anxiety
- Defeat
- Dangerous situations
- A small character inside a vast environment
Even with the exact same character:
Low Angle Shot → Powerful and dominant
High Angle Shot → Small and vulnerable
The impression can change completely.
9. Over-the-Shoulder Shot — Naturally Show Conversations and Confrontations
An Over-the-Shoulder Shot frames one character from behind their shoulder while looking toward another character.
Over-the-Shoulder Shot from behind James as he talks to Alex.
This composition is extremely common in film and television dialogue scenes.
It works especially well for:
- Conversations
- Negotiations
- Confrontations
- Confessions
- Interrogations
Rather than simply placing two characters side by side, an Over-the-Shoulder Shot creates a stronger sense of perspective and helps viewers become more immersed in the interaction.
10. POV Shot — Show the Scene From the Character's Perspective
A POV, or Point of View Shot, shows what the character is directly seeing.
POV Shot of James looking down at his trembling hands.
For example, if a character slowly opens a door and looks inside a room:
POV Shot as James slowly opens the door and looks inside the dark room.
POV Shots can make viewers feel as if they are experiencing the scene directly through the character.
They are especially effective for:
- Horror
- Action
- Exploration
- Chase scenes
- Suspenseful moments
✨ Tooners Tip: Choose the Shot Based on the Purpose of the Scene
Camera composition is not just terminology for making a shot look more cinematic.
It is a tool for deciding what the audience should pay attention to most in the scene.
For example:
If you want to emphasize emotion:
→ Close-Up
If you want to emphasize movement:
→ Wide Shot / Full Shot
If you want a character to feel powerful:
→ Low Angle Shot
If you want a character to feel vulnerable:
→ High Angle Shot
If you want to show the entire environment:
→ Extreme Wide Shot
Before choosing a shot, ask yourself:
"What should the viewer notice first in this scene?"
💡 A Simple Way to Think About Camera Composition
The goal of adding camera directions to a prompt is not to fill it with complicated filmmaking terminology.
It is about telling AI:
"What do I want to show, and how do I want to show it?"
When creating your next scene, start by thinking about these three elements:
- What do you want to emphasize most? (Subject)
- How close should the camera be? (Shot Size)
- From which position should the camera view the subject? (Camera Angle)
And if necessary, you can also add:
- How should the camera move? (Camera Movement)
- What other elements should appear inside the frame? (Framing)
A simple prompt like:
James is standing.
can become:
Low Angle Medium Shot of James standing confidently, with towering buildings behind him as the camera slowly dollies in.
With just a few additional camera directions, the visual intention of the scene becomes much clearer.