Production tips
Finding Your Style with ComfyUI, Then Locking It In with Toonkit
 Team ToonkitViews —


Hello. This is the Toonkit development team.
In our previous post, we covered how to put together a dataset and configure training parameters for Toonkit's My Style LoRA training feature.
Once you've read that post, a natural question follows: where do you get 20 images that are consistent in style but varied in content?
The surest answer is to make them yourself. And the most widely used tool for that is ComfyUI.
Before we start, there's one thing worth pointing out. Finding the art style you want in ComfyUI is not the same as owning that style.
A look you achieve in ComfyUI doesn't survive as an artifact — it survives as a procedure. One checkpoint, a handful of LoRAs with their individual strengths, a sampler and scheduler, an upscale path, even the order in which nodes are wired: the whole combination has to be in place before the same image comes back. Drop one LoRA or nudge a strength value and the look shifts. The same happens when you move the workflow to another machine or a custom node changes version. The style isn't in a file — it's bound to the workflow.
On any job that requires producing multiple panels, that dependency turns directly into cost. You have to reassemble the same conditions for every panel, and the moment anything drifts, line work and color start to diverge from panel to panel.
Toonkit's My Style addresses exactly this. Train the look you found through your workflow on 20 images, and that look is settled into a single LoRA file. From then on you don't reproduce a node graph — you just load the style. What was scattered across a procedure becomes a fixed style.
So the goal of this post is not to make you fluent in ComfyUI. It's to give you just enough ComfyUI to produce the 20 images that will define your style. We'll walk through the relationship between CivitAI and ComfyUI, how to read a workflow, how to stack and blend LoRAs, how to upscale, and what's worth knowing when you're generating anime-style images.
ComfyUI tends to look intimidating because of all the interconnected nodes on screen. But every workflow is built from the same six stages. Once you understand that skeleton, you can read a workflow you've never seen before.
Also, the values in this post are not universal answers. What works depends on the model you use and the style you're aiming for, so treat these as starting points for your own generation and training runs.
Installing ComfyUI is well documented officially, so we won't cover it here — we'll focus on what happens after installation.
1. How are ComfyUI and CivitAI related?
The role of these two services is what confuses newcomers most. Their names come up together constantly, but they do completely different things.
1.1 They serve different purposes
CivitAI is a model repository and a results gallery. It's where you download models other people have built and browse the images and settings they produced with them. CivitAI does not generate images for you.
ComfyUI is the execution engine. It's the program that assembles downloaded models and actually generates images.
By analogy, CivitAI is a grocery store combined with a food photography board, and ComfyUI is your kitchen. You buy ingredients at the store, look through other people's photos and recipes, and then do the actual cooking at home.
1.2 Check the base model family first
Models come in families. When families don't match, loading a LoRA either does nothing at all or throws an error.
- SDXL: The general-purpose family. Mixes natural language with tags and uses negative prompts.
- Pony: Distinguished by score-tag syntax such as
score_9, score_8_up. - Illustrious / NoobAI: Specialized for anime styles. Prompts are written against Danbooru tags.
- Flux.1: Strong at understanding natural-language sentences. Has no negative prompt.
- Anima: Trained primarily on anime illustration. Like Flux, it loads the model itself, the text encoder, and the VAE separately, and it uses a Qwen-family text encoder.
In short, you can't use an SDXL LoRA on a Flux model, or the other way around. Getting into the habit of checking the base model listed on the model page before downloading a LoRA will save you from this entirely.
2. How to read generation data
When you find an image you like on CivitAI, you can see how it was made. That's the generation data.
2.1 What's in the generation data?
The image detail page shows you the following:
 Screenshot 2026-08-05 at 12.23.44 PM.png
- Prompt (positive conditioning)
- Negative prompt (negative conditioning)
- Steps
- Sampler and scheduler
- CFG Scale
- Seed
- Image size
- Model name
- LoRAs used, with their weights
- Clip skip
- Upscale settings
Carry these values over to the corresponding nodes in ComfyUI and you'll get something close to the original.
That said, exact reproduction isn't a goal worth chasing. Some things — node wiring, custom nodes — are never recorded in the generation data, so recreating someone else's image identically is generally impossible. Our aim is to produce as many images as we need in the look we want, and for that, generation data works perfectly well as a reference point to start from.
2.2 What does each value mean?
The Training Steps and Learning Rate from the previous post are training parameters. The values here are generation parameters, so they're a different set entirely.
Steps determines how many stages the image is built over. Typically 20 to 35. Flux-family models produce results with relatively few steps. Higher is not automatically better — past a certain point you're only adding time.
CFG Scale determines how strictly the model follows your prompt. Low values let the model roam; high values force adherence but can oversaturate colors or make the image look unnatural. The healthy range differs by family.
The Flux family uses FluxGuidance instead of CFG. The value is almost always 3.5. Look through a few Flux workflows and you'll find 3.5 set nearly without exception. Unless you have a specific reason, leave it there and start from that.
Sampler and scheduler control how the image is resolved. Conventions are quite well established per family.
- SDXL and Illustrious families:
dpmpp_2m+karrasis widely used. - Flux family:
euler+simple. - Anima family: you'll sometimes see less familiar samplers like
res_2s,res_3m, orer_sdepaired with thebeta57scheduler.
Clip skip skips the last few layers of the text encoder. With anime-style models, 2 is the convention. In ComfyUI you set it with the CLIPSetLastLayer node.
Seed is the random value the image starts from. Same settings plus same seed gives you the same result. Reproducibility hinges entirely on this one value.
Image size should match the size the model was trained at. In the SDXL family, 832×1216, 1024×1024, and 896×1152 are common. Stray far outside that range and you may end up with duplicated figures or a collapsed composition.
3. How to read a workflow
3.1 Every workflow is six stages
The first time you see a ComfyUI canvas, the tangle of nodes and wires feels impenetrable. But every workflow reduces to these six stages.
-
Load the model: Bring in the model you'll use.
 Screenshot 2026-08-05 at 12.25.28 PM.png
 Screenshot 2026-08-05 at 12.25.17 PM.png
 -
Encode the prompt: Convert text into a form the model understands.
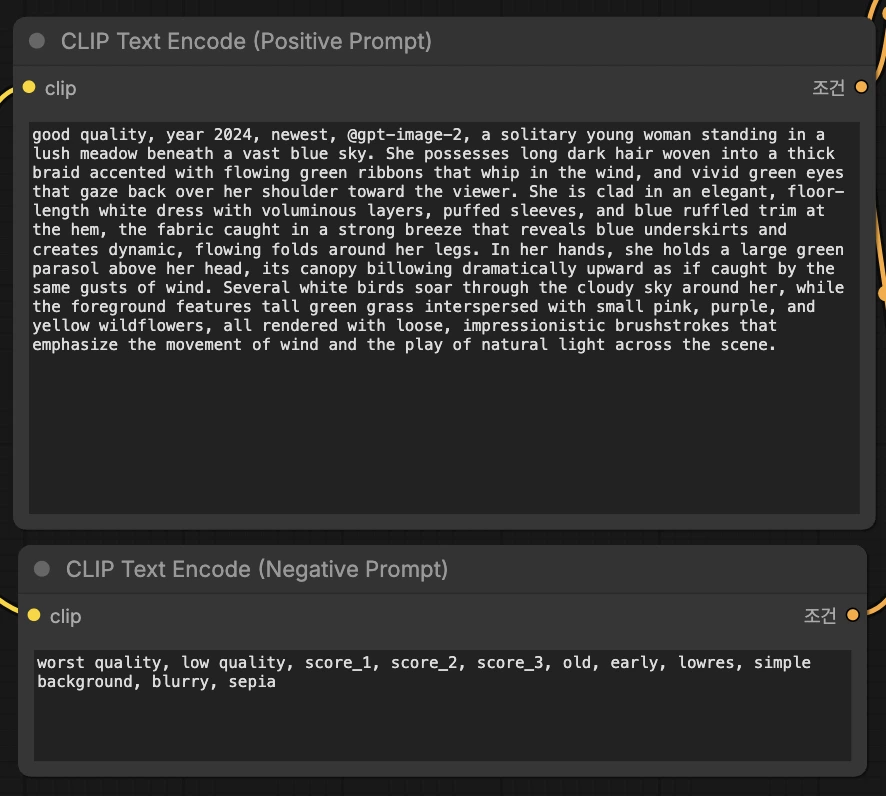 Screenshot 2026-08-05 at 12.25.38 PM.png
 -
Create an empty canvas: Set the size of the image you're making.
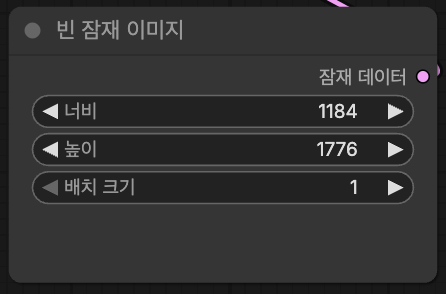 image.png
 -
Sample: The stage where the image is actually generated.
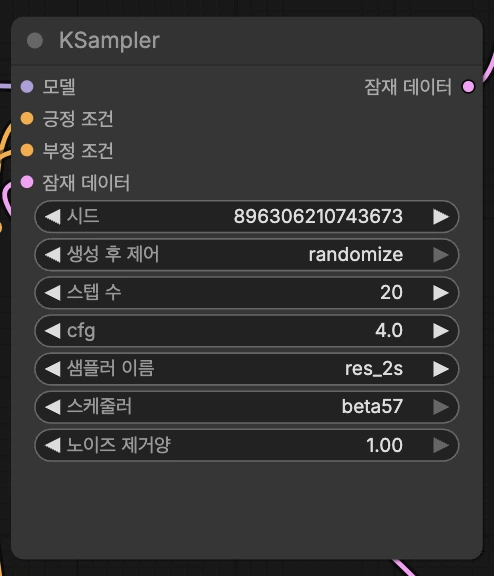 image.png
 -
Decode: Turn the result into a visible image.
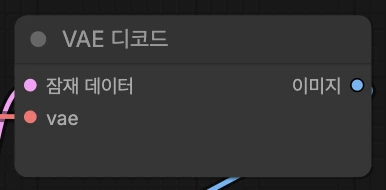 image.png
 -
Save: Write it out to a file.
When you meet an unfamiliar workflow, try sorting each node into one of these six buckets. Even at 30-plus nodes, most of them are helper stages clustered around stage 4.
3.2 The simplest shape — the SDXL family
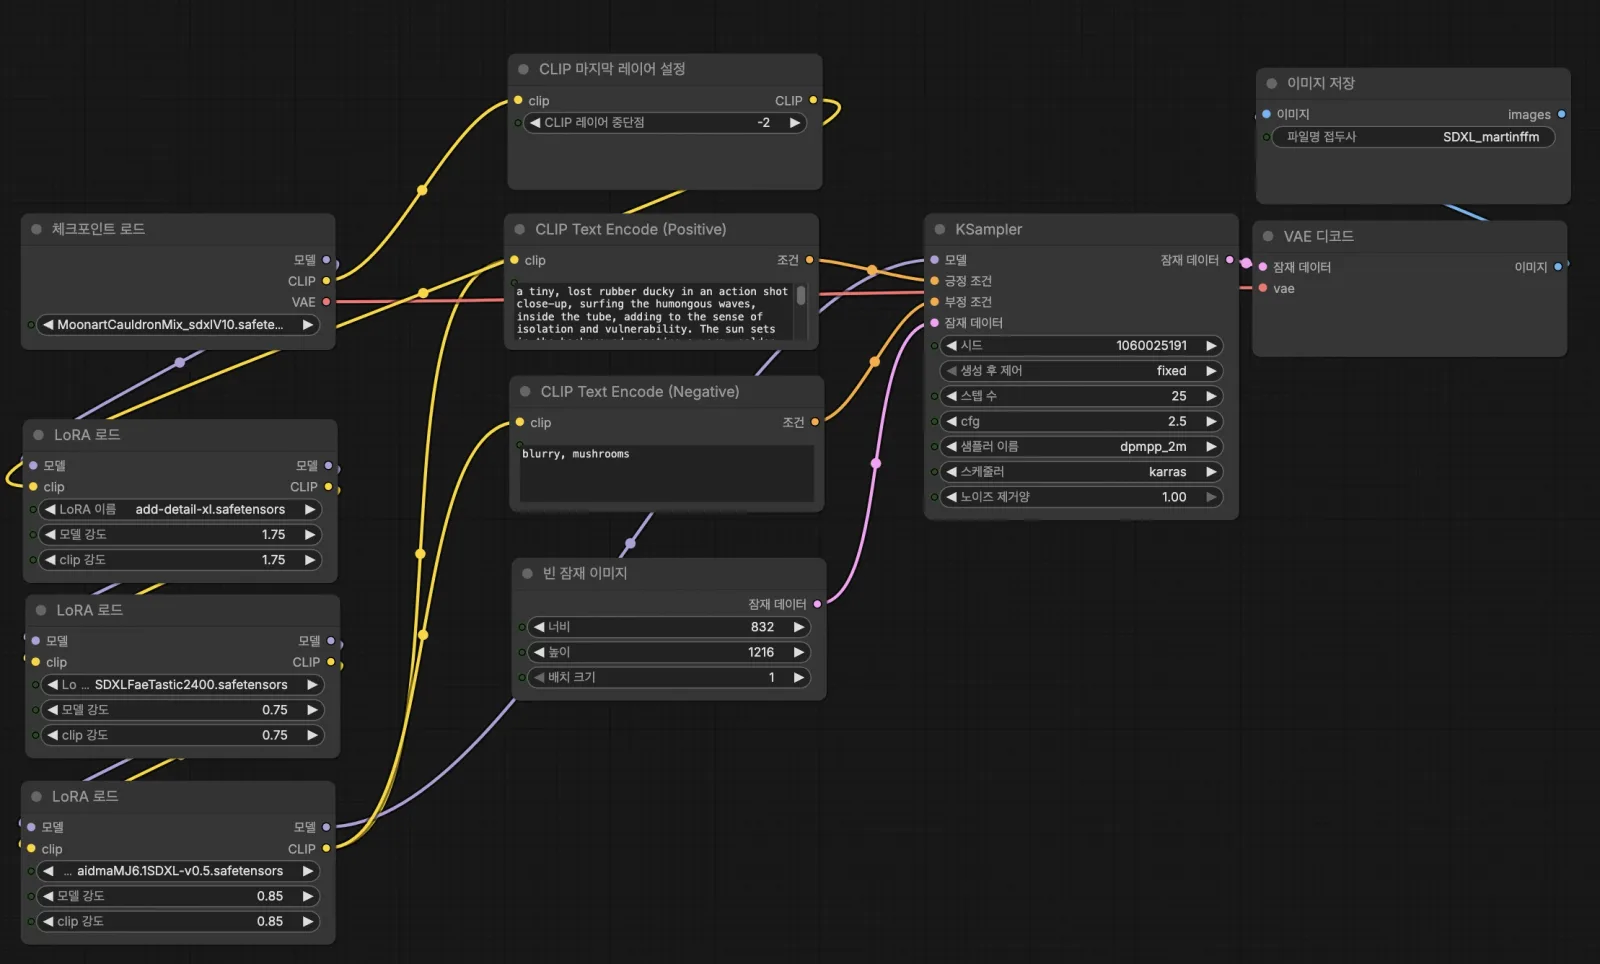 image.png
SDXL and Illustrious workflows have a simple structure.
CheckpointLoaderSimple
  → CLIPSetLastLayer(2)
  → LoraLoader
  → CLIPTextEncode(positive) / CLIPTextEncode(negative)
  → KSampler
  → VAEDecode
  → SaveImage
If a workflow has roughly ten nodes, this is the shape. A single checkpoint contains everything needed, which keeps the loading stage simple.
A real example uses settings like these.
- Image size:
832×1216 - Clip skip:
2 - Steps: 25
- CFG: 2.5
- Sampler and scheduler:
dpmpp_2m+karras
One detail is worth noticing. In this example, the detail-adding LoRA is set to a weight of 1.75. LoRA weights are not capped at 1.0. Values above 1.0 do get used. Just be aware that images grow less stable as you push higher, so raise the value gradually and check as you go.
3.3 The Flux family looks different
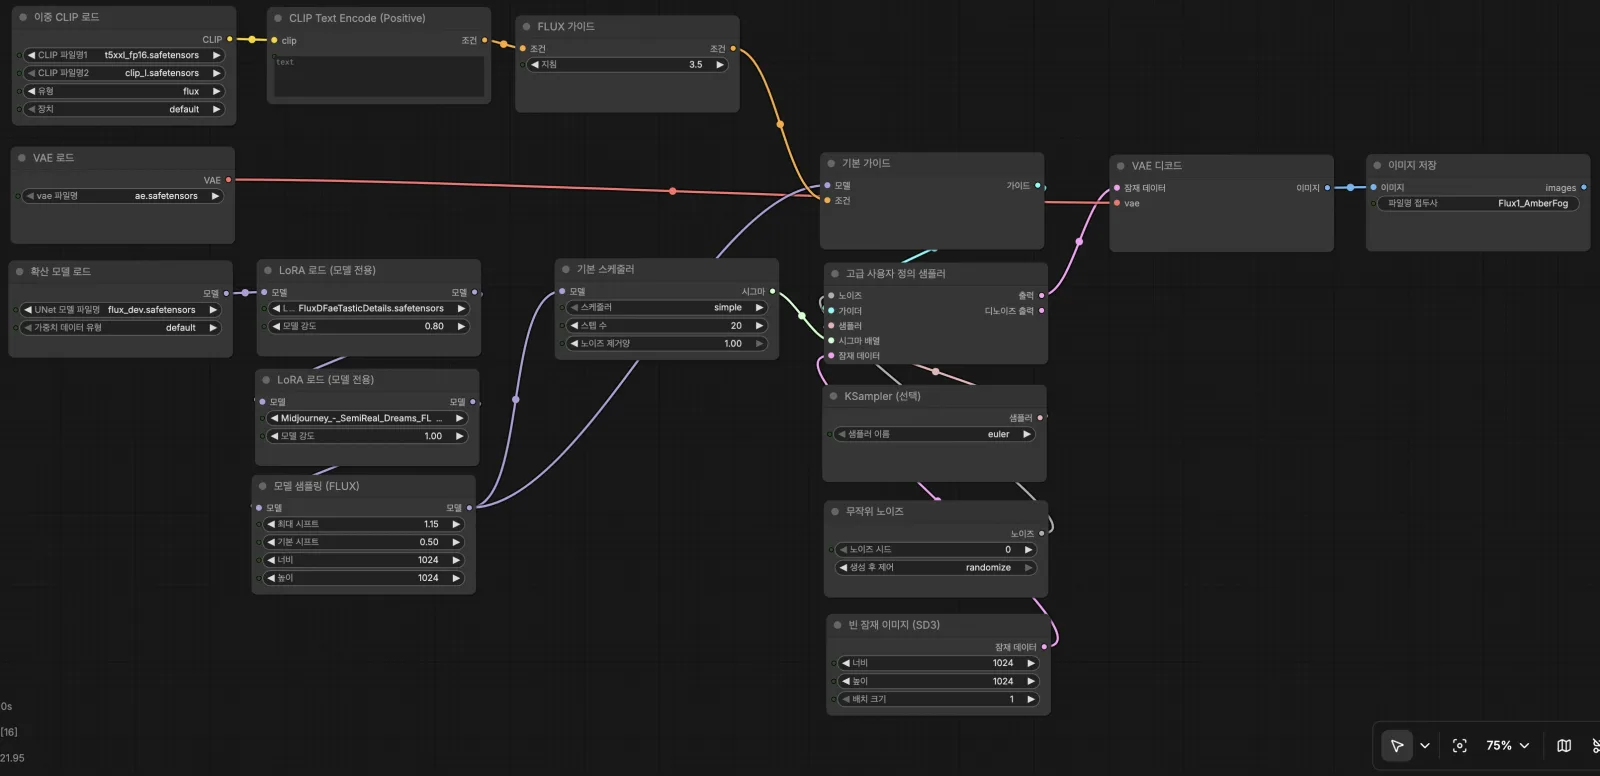 image.png
The first time you open a Flux workflow, it looks so unlike SDXL that it's easy to feel lost. There are three differences.
First, loading is split across three nodes.
UNETLoader (the model itself)
DualCLIPLoader (two text encoders)
VAELoader (the VAE)
Each file also goes in a different folder. The model itself belongs in models/unet/, text encoders in models/clip/, and the VAE in models/vae/. Put a file in the wrong folder and it won't appear in the list, even though you downloaded it correctly.
Second, there is no negative prompt. The Flux family has no node for negative conditioning. This is what throws SDXL users most. To keep unwanted elements out, you have to write a more specific positive prompt instead.
Third, FluxGuidance replaces CFG. As described above, start with the default of 3.5.
Flux workflows also tend to use LoraLoaderModelOnly rather than LoraLoader. That node applies the LoRA only to the model, not to the text encoder.
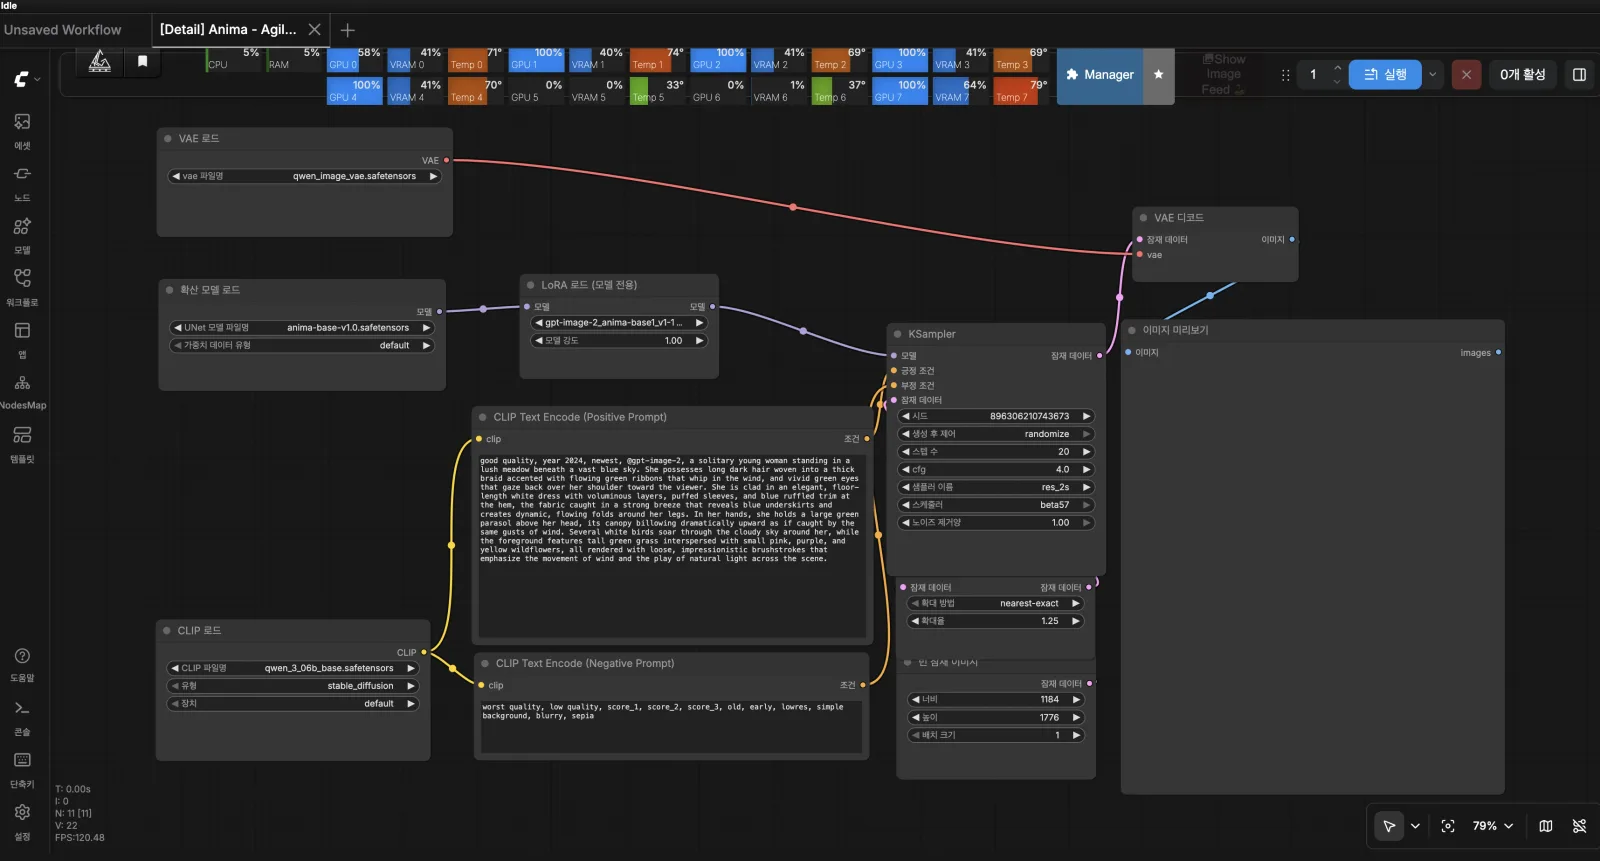
3.4 What's different about the Anima family?
image.png
Like Flux, the Anima family splits its loading nodes — but the files it loads are different.
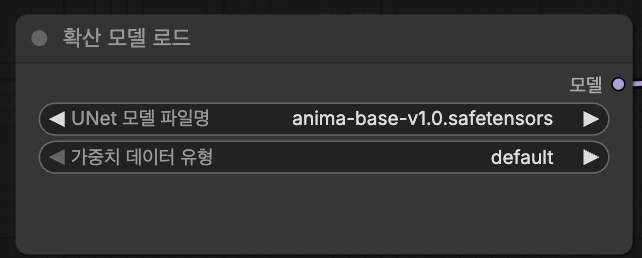
UNETLoader (Anima-family model)
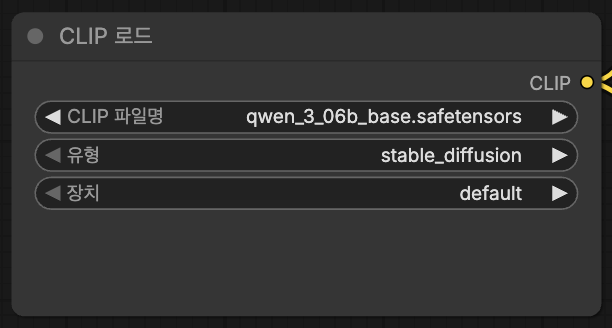
CLIPLoader (Qwen-family text encoder)
VAELoader (Qwen-family VAE)
The CLIPLoader node has a type selector. Set it to qwen_image. Any other value and your prompt won't be applied properly.
Settings you'll see in practice:
- Steps: around 25
- CFG: 4 to 4.5
- Sampler and scheduler:
res_3m+beta57, among others
Because the Anima family uses a different text encoder, prompting for it feels somewhat different too. It's worth trying both tag lists and descriptive sentences and comparing the results.
With families that split their loading nodes, wiring everything by hand from scratch invites mistakes. We recommend loading an existing workflow and adjusting only the values.
4. How to stack and blend LoRAs
The previous post covered how to train a LoRA. This one covers how to use a trained LoRA.
4.1 LoRAs chain together
 Screenshot 2026-08-05 at 12.35.29 PM.png
You can use several LoRAs in sequence. The model passes through the first LoRA, and that result passes through the second.
Model → LoRA 1 → LoRA 2 → LoRA 3 → Sampler
The LoRA loader node has two strength controls.
strength_model: The strength applied to the model itself. Affects shapes and appearance.strength_clip: The strength applied to the text encoder. Affects how the prompt is interpreted.
Being able to tune these two separately matters. Push strength_clip too high and the meaning of your prompt gets distorted, so you stop getting the content you asked for.
4.2 What strength should you start at?
These values are reasonable starting points.
- Style LoRA: around
0.6 - Character LoRA:
strength_model 0.9/strength_clip 0.7 - Clothing or prop LoRA: around
0.4
And follow these two rules.
First, use only one character LoRA at a time. Layering multiple style or background LoRAs is fine, but turn on two or more character LoRAs and faces tend to blend into a mess.
Second, always test each one in isolation before combining them. Turn on five LoRAs at once and get a strange result, and you have no way to tell which one caused it. Enable them one at a time, confirm what each does, and only then combine.
When comparing, fix the seed. If the seed changes, you can't tell whether the difference came from the LoRA or from the seed.
4.3 How many LoRAs can you stack?
Let's compare two real cases.
Using a single LoRA. One background-style LoRA at strength 1.0. The setup is simple, and the result holds up perfectly well.
Stacking ten LoRAs. Hand fixing, blur suppression, detail enhancement, anime styling, color boosting — each handled by its own LoRA, combined at strengths from 0.25 to 1.0. The output looks impressive, but there are problems.
- It's hard to tell which LoRA is doing what.
- Change one and the whole balance falls apart.
- Recreating the same combination is difficult.
- Nothing defines what the target style actually is.
That last point is the important one. This is precisely the workflow dependency described earlier. The look is scattered across ten files and ten numbers, and if any one of them is off, the result changes.
If your purpose is building training data, fewer LoRAs is better. The previous post warned against mixing multiple styles into one dataset — and layering ten LoRAs is, by itself, a mix of multiple styles.
4.4 Don't forget the trigger word
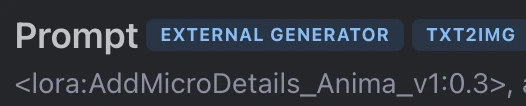 Screenshot 2026-08-05 at 12.37.24 PM.png
If you've loaded a LoRA and nothing changes, check the trigger word.
As explained in the previous post, a trigger word is the unique token that summons the trained style. In many cases, the effect only appears when you include the word the LoRA's author used during training.
CivitAI model pages list a Trigger Words field. Make a habit of checking it whenever you download a LoRA.
4.5 Stacking and blending are not the same thing
Everything so far has been about chaining LoRAs together. Let's call that stacking.
Stack enough LoRAs and you start running into problems like these.
- Turn on two style LoRAs together and image quality falls apart.
- Turn on a character LoRA and it changes the art style along with it.
- Lower the strength and the effect disappears; raise it and it ruins something else.
These aren't solvable by adjusting strength alone. Here are the techniques available, in order of difficulty.
Level 1: Separate the strengths
The simplest approach, and the fastest to pay off.
If a character LoRA is also changing your art style, try lowering only strength_clip. You keep the strength on the model side while reducing the influence on prompt interpretation.
The 0.9 / 0.7 pairing mentioned earlier is this principle in action.
Level 2: Compare order and strength under fixed conditions
The order in which you chain LoRAs changes the result. Fix the seed and compare with only the order varied.
The XY Input: Lora Block Weight node in ComfyUI-Inspire-Pack automatically compares many settings in a grid. No more running them one at a time by hand.
Level 3: Restrict the scope to specific blocks
The most practical technique.
The Lora Loader (Block Weight) node from ComfyUI-Inspire-Pack lets you apply a LoRA to a subset of the model's blocks rather than the whole thing.
Mitigating the quality degradation that occurs when several LoRAs are used together is exactly what this node was built for.
When two style LoRAs conflict, restricting one of them to a subset of blocks can let both styles survive.
You configure it by listing per-block weights — for example, giving values to specific blocks and leaving the rest at 0. Block counts differ by model family, and you can subdivide down to sub-blocks.
That said, there's no official documentation of which blocks govern art style and which govern composition. All that exists is what the community has worked out empirically, so we recommend finding it yourself with the XY comparison node described above.
Level 4: Split the application window
Image generation runs across many steps. And the earlier steps determine overall composition, while the later steps determine fine detail.
You can exploit this to apply a LoRA only where it's needed.
- Apply a character LoRA only to the later window, and the base model sets the composition while just the face picks up the character traits.
- Apply a style LoRA only to the early window, and the look is locked in while detail work proceeds freely.
- You can also ramp strength gradually from 0 to 1.
This feature is built into ComfyUI — no custom nodes required. Wire up the following.
Create Hook LoRA
  → Create Hook Keyframes Interp.
  → Set Hook Keyframes
  → Set CLIP Hooks → Cond Pair Set Props → Sampler
start_percent sets when the LoRA kicks in: 0.0 is the beginning, 1.0 is the end, and 0.5 is the midpoint. strength_mult controls the strength at that point.
One caution: enabling schedule_clip increases generation time substantially. Use it only when you need it.
Level 5: Regional application and file merging
At this level the range of what's possible widens considerably. In this post we'll only outline what's available.
Regional application means applying different LoRAs to different areas of the image. With two characters on screen, you can give each of them their own character LoRA. ControlNet is typically used alongside it to keep both characters' poses consistent. Areas left outside your masks can develop washed-out patches, so you also need a node that supplies a default value.
File merging combines several LoRAs into one file. Custom nodes such as LoRA Power-Merger handle this, offering algorithms ranging from simple weight addition to more sophisticated approaches using singular value decomposition.
5. Upscaling and hires
5.1 There are four approaches
There are broadly four ways to increase resolution, and they behave quite differently.
First, using an upscale model alone. Uses the UpscaleModelLoader and ImageUpscaleWithModel nodes. Fast, but it won't invent detail that wasn't there. With anime line art, there's a risk of lines smearing.
Second, upscaling in latent space. Uses the LatentUpscaleBy node. The result won't be identical to the original.
Third, two-pass hires. Generate once, upscale, then regenerate at low strength. Detail is genuinely added, so this gives the best results. If you're building training data, this is the approach we recommend.
Fourth, Ultimate SD Upscale. Uses the ComfyUI_UltimateSDUpscale custom node. It processes the image in tiles, so memory pressure stays low even at large resolutions. Note that detail will shift even at low regeneration strength, so apply identical settings across all images to keep the treatment consistent throughout the set of 20.
5.2 What is two-pass hires?
Since this is the approach we most recommend, let's go into detail.
First pass (generate at strength 1.0)
  → VAEDecode
  → Upscale with an upscale model
  → Resize to the target dimensions
  → VAEEncode
  → Second pass (regenerate at low strength)   ← this is the key part
The key is the strength of the second pass — the denoise value.
- Below 0.3, almost no detail is added and the image stays soft.
- 0.4 to 0.5 is the generally recommended range.
- Around 0.35 is the conservative setting: it preserves the original composition as much as possible while layering detail on top.
Push it too high and you end up with a different image entirely. Since preserving composition matters when building training data, start low and raise it gradually.
5.3 Use a dedicated upscale model for anime
Upscale models behave differently depending on what they were trained on. Use a photo-oriented model on an anime image and lines break up or pick up noise.
For anime styles, try these models first.
RealESRGAN_x4plus_anime_6B: Anime-specific. Preserves line art well.4x-AnimeSharpor2x-AnimeSharpV2: Anime-specific, with crisp results.4x_NMKD-Siax_200k: Handles both photographic and anime content reasonably.4x-UltraSharp: Suits crisp digital art.remacri_original: Produces a comparatively soft texture.
Always inspect upscale results at 100% zoom. Smeared lines are hard to notice on a scaled-down view.
6. What's worth knowing when generating anime-style images
This is the most practical section for Toonkit users.
6.1 Prompt syntax differs by family
Put the same prompt into models from different families and the results diverge sharply. The syntax is different.
The Pony family uses score tags.
score_9, score_8_up, score_7_up, ...
The Illustrious family uses quality tags.
masterpiece, best quality, ...
Here's something you have to know: feed Pony's score tags to an Illustrious model and it simply won't understand them. Copy a prompt over from another family as-is and the entire leading section of tags can end up meaningless.
In the NoobAI family, quality tags correspond to quality rankings in the training data.
masterpiece: top 5%best quality: top 5–15%good quality: top 15–40%normal quality: top 40–70%worst quality: bottom 30%
In the Flux family, quality tags carry no meaning. Write descriptive sentences instead of listing tags.
6.2 Learn Danbooru tag syntax
The Illustrious family was trained against Danbooru's tags, so prompts need to be written to match that tag system.
- Tags written earlier carry more weight. Influence drops off toward the end. Put the important elements first.
- Verify that a tag actually exists. Use an expression that isn't in Danbooru and the model won't respond to it.
- Use Danbooru's own ordering for character names.
- Put colors before their subject — write it as
black coat. - Escape tags containing parentheses with backslashes — write
star \(symbol\). Otherwise they're parsed as emphasis syntax. - Overly long prompts stop being applied toward the end. Treat roughly 250 words as your ceiling.
6.3 Year tags can shift the era of the art style
The Illustrious and NoobAI families include tags indicating when the artwork was drawn.
old: 2005–2010early: 2011–2014mid: 2014–2017recent: 2018–2020newest: 2021–2024
Changing this one tag noticeably changes the look. Eye rendering, line weight, and coloring approach all shift toward the tendencies of that era.
The previous post used a 1990s cel animation style as an example. If that's the kind of retro look you're after, this tag is your most direct tool. Conversely, use newest when you want something in a current idiom.
Hold everything else constant and compare by changing only this tag. It's one of the fastest ways to find your target style.
6.4 Recommended generation settings
Using the Illustrious family as a baseline, these are reasonable settings to start from.
- Don't exceed a CFG of 6. Colors oversaturate. We recommend starting at 3 and raising it gradually.
- Use 20 to 32 steps.
- For the sampler, some sources recommend
euler, whiledpmpp_2m+karrasis also widely used. Compare the two yourself. - Set Clip skip to
2. - Use a standard image size such as
832×1216.
Checkpoint pages often list settings recommended by the model's author. When they do, start from those.
6.5 Negative prompts and embeddings
Here's a negative prompt structure widely used for anime-style generation.
worst quality, low quality, lowres, jpeg artifacts, watermark, artist name,
bad anatomy, bad hands, extra fingers, fused fingers, missing fingers
To suppress specific elements more strongly, you can use emphasis syntax.
(bad hands:1.3), (extra fingers:1.3), (six fingers:1.4)
You can also use an embedding file that bundles a negative prompt in advance. Drop the file into models/embeddings/ and call it from your prompt as embedding:filename. It's a good way to condense a long negative prompt.
Keep in mind, though, that the Flux family has no negative prompt. Check the family before relying on this.
7. Common problems
Nodes are showing up in red. A custom node isn't installed. Run Install Missing Custom Nodes in ComfyUI Manager, then restart.
I downloaded a model but it isn't in the list.
Check the folder. Flux-family models belong in models/unet/.
I enabled a LoRA and nothing changed. Check that the base model family matches. An SDXL LoRA won't work on a Flux model.
I enabled a LoRA but only the style doesn't come through. Check the trigger word. You need to add the Trigger Words entry from the CivitAI model page to your prompt.
I can't find the negative prompt field in Flux. The Flux family doesn't have one. Adjust the FluxGuidance value instead.
Colors are muddy and everything looks soft. The VAE may not match the model. Flux needs its own VAE; Anima needs a Qwen-family VAE.
The model isn't following my prompt well.
The LoRA's strength_clip may be too high. Lower it and compare.
score_9 isn't working on an Illustrious model.
Score tags are Pony syntax. Switch to masterpiece, best quality.
Lines smear after upscaling. You're most likely using a photo-oriented upscale model. Switch to an anime-specific one, and use two-pass hires rather than an upscale model alone.
I applied hires and it's still soft. The second pass's denoise may be below 0.3. Try raising it to between 0.4 and 0.5.
All the images I made look alike. Changing only the prompt while keeping the seed fixed produces similar compositions. Change the seed as well.
8. Wrapping up
We've walked through how to generate images with ComfyUI. There was a lot of ground to cover, but it comes down to three things.
First, every workflow is six stages. Load the model, encode the prompt, create an empty canvas, sample, decode, save. Sort any unfamiliar workflow into those six buckets and you can read it.
Second, syntax differs by family. SDXL, Pony, Illustrious, Flux, and Anima differ in how prompts are written and how nodes are arranged. Copy settings across families and they won't work.
Third, the look you've found here is still bound to a workflow. The checkpoint, the LoRA combination, the strengths, the sampler, the upscale path — all of it has to be in place for the same image to come back. As panel counts grow, reassembling those conditions every time becomes a burden, and the slightest drift shows up as inconsistency between panels.
That's why one last step is needed. Take the look you found in ComfyUI, narrow it down to 20 images, and upload them to Toonkit's My Style LoRA training feature. Once training finishes, that look is settled as a style rather than a procedure. From then on — without reproducing the workflow, without rewiring a single node — the same look holds across every panel you make.
Don't try to build a perfect workflow from the start. Load an official template or a workflow from CivitAI, change values a little at a time, and compare results — that's the fastest route. The goal isn't a perfect workflow. It's 20 images that define your style.
Was this article helpful?
Your feedback helps us create our next article.
More to read
View all ›
Create Your Own Style LoRA with ToonKit
Guidelines for Dataset Composition and Parameter Configuration for Training a High-Quality Style LoRA with 20 Images
Team Toonkit58 views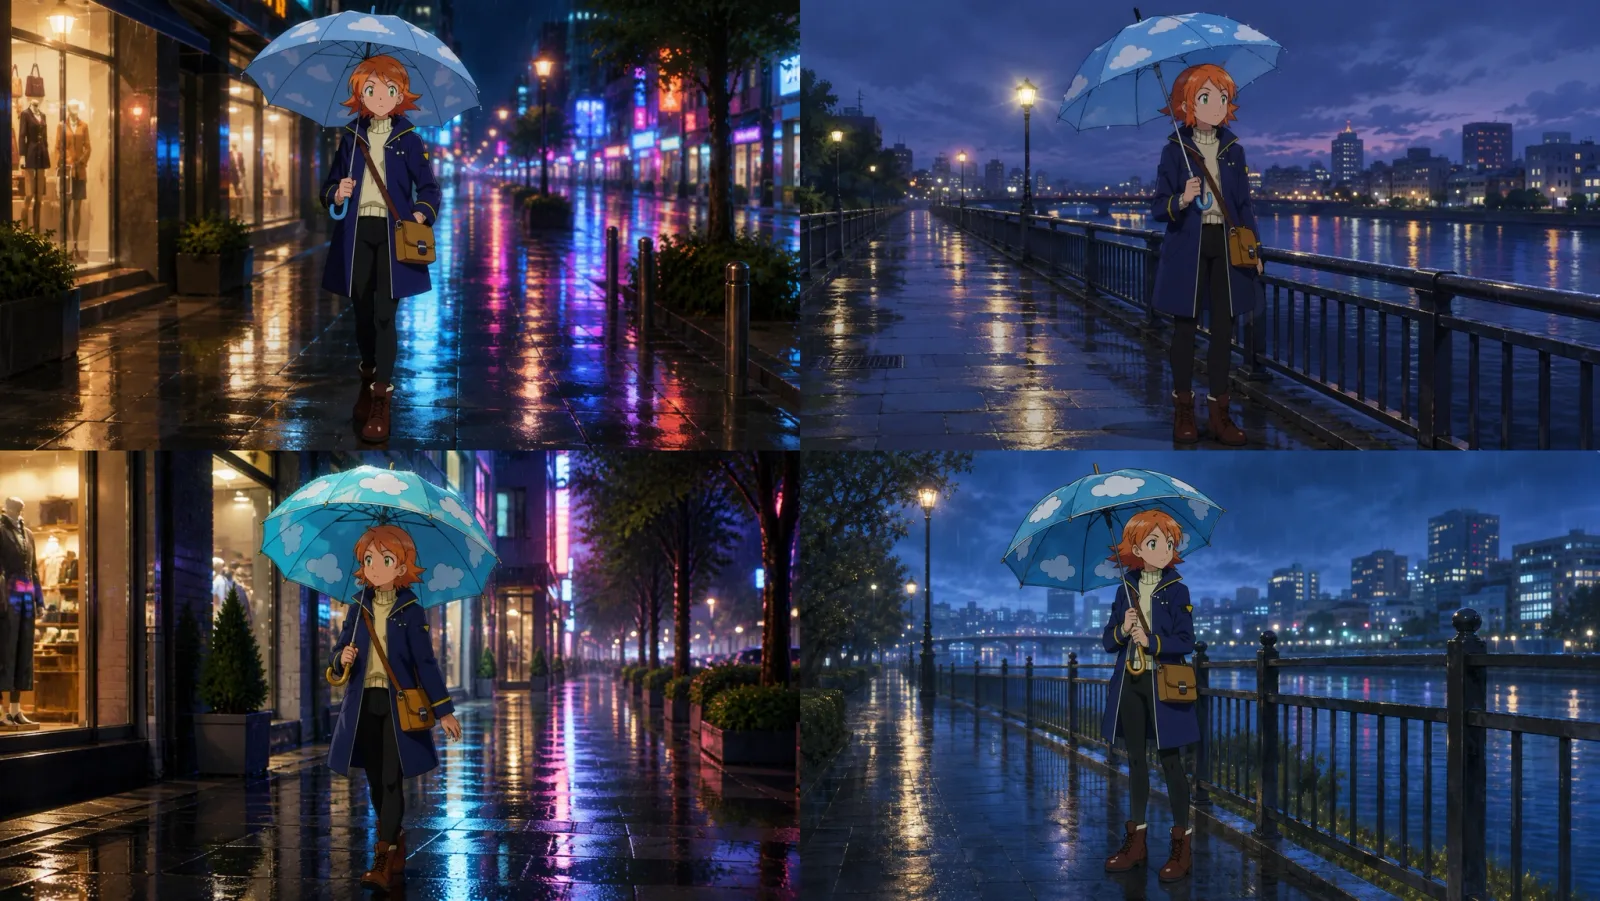
Why does the same umbrella look different every time? Before vs. after specifying prop references
How big is the difference between describing a prop in a prompt versus referencing an actual prop image? Here is a direct comparison featuring the same umbrella across two different scenes.
Team Toonkit65 views
Prompt Tips for Tooners #3 - 10 Camera Shots and Angles
The same scene can look completely different depending on camera composition. From Extreme Wide Shot to POV Shot, this post introduces 10 camera shots and angles you can use directly in AI image and video prompts.
Team Toonkit44 views